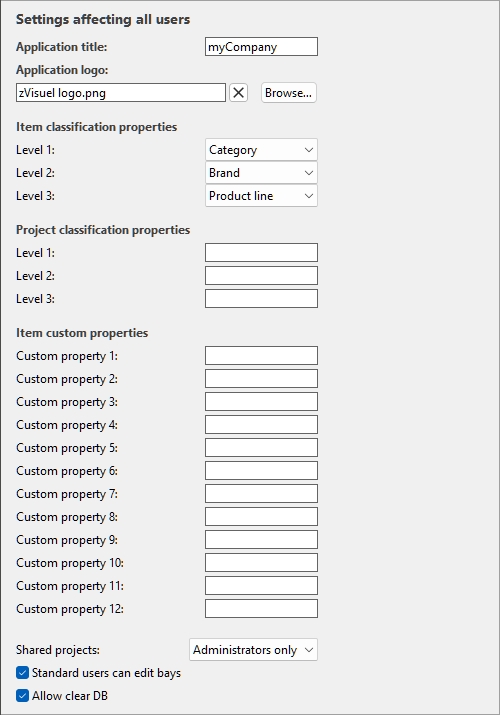
Settings affecting all users
The settings below apply to all PlanogramBuilder users sharing your accountID, typically all users in your company.
Note: The settings in this section can only be set by PlanogramBuilder Administrator.
Interface customization
The following settings allow you to display your own company name and logo in the PlanogramBuilder window.
Application title
Defines the title of the application for all PlanogramBuilder users in your company (sharing your accountID). Normally, the title already shows your company name or your name if you are an individual person. The title appears in light blue at the upper right corner of PlanogramBuilder screen (consult the image of Screen Layout).
- Supported values: text, including Unicode characters for non-Latin text values
- Default value: the company name (or the first and last name for individual persons) entered when ordering your license (= none)
- Example: zVisuel SA
Application logo
Defines an optional logo picture on the title bar visible to all PlanogramBuilder users in your company (consult image of Screen Layout).
- Supported values: filename and extension in supported format (jpg, png, bmp, gif, tif)
- Default value: empty (= none)
- Example: zVisuel logo.png
Instructions:
- Click on Browse.
- Select the desired image file on your PC.
- Click on Open.
- Wait for the image to upload.
To remove the logo image, click on the small red cross button.
Note: Images with a transparent background are supported in PNG format. When such an image is used, the normal PlanogramBuilder title bar color is displayed behind the transparent part of the logo image.
Database configuration
The following settings let you customize some database properties to match the way you describe and classify your products. These fields should be defined before adding products in the database.
Item classification properties
PlanogramBuilder provides three customizable properties (A, B, C) to hierarchically classify your products, accessories and projects to best match your internal product classification:
- A: Classification - level 1: the first level of classification.
- B: Classification - level 2: the second level of classification.
- C: Classification - level 3: the third level of classification.
Although not compulsory, it is convenient to define the names of each property to match a logical hierarchical order. This will make it easier to drill down in the Product catalog when searching for products. For example, define the first level as Category, the second level as Product line, not the opposite.
To change these property names to match your own classification levels, select a predefined name from the drop-down list for each level. Select Custom if the predefined names don’t fit your needs. A new text field will appear where you can type the desired name, such as shown below with Year and Country.
· Supported values:
Brand
Brandline
Category
Group
Main group
Manufacturer
Product line
Region
Sub-brand
Subcategory
Subgroup
Custom
- Default values:
- A: Classification - level 1: Category
- B: Classification - level 2: Brand
- C: Classification - level 3: Product line
Examples of possible combinations:
|
|
Default names |
|
Example 1 |
|
Example 2 |
|
Example 3 |
|
A: Classification - level 1 |
Category |
|
Category |
|
Category |
|
Country |
|
B: Classification - level 2 |
Brand |
|
Subcategory |
|
Group |
|
Category |
|
C: Classification - level 3 |
Product line |
|
Region |
|
Year |
|
Subcategory |
Important note: If you enter a custom name for a classification property, make sure not to use the same name as a predefined item property. For example, do not assign the name Reference or Enabled.
Once you have defined the names for the three properties, you can assign values to each product and accessory in the database under Item properties, and to each project in Project properties.
These properties and values are then also shown in the following PlanogramBuilder areas:
- Database item list (for products and accessories)
- Catalog of products (for products)
- Catalog of accessories (for accessories)
- Project item list (for products and accessories)
- Reports (for products and accessories)
- Template catalog (for projects)
Item custom properties (Settings)
PlanogramBuilder provides up to 12 user-defined optional properties to add attributes to your products and accessories (not applicable to projects).
To enable a custom property, you must name it. The property thereby becomes available in your database.
- Supported values: text, including Unicode characters for non-Latin text values
- Default value: blank (= none)
- Example: Weight
As an example, let’s create a property to hold the weight of your products in your database:
- Custom property 1: type Weight then press enter to validate.
- The property is now defined, and weight values can be assigned to your items.
Important note: If you enter a custom name for a classification property, make sure not to use the same name as a predefined item property. For example, do not assign the name Reference or Enabled.
Once you have defined the name of a property, you can assign values to each product and accessory in the database under Item properties.
These properties and values are then also shown in the following PlanogramBuilder areas:
- Project item list (for products and accessories)
- Reports (for products and accessories)
User rights settings
In this section, you will find settings to control how users can edit and share planograms.
Shared projects
If there are several PlanogramBuilder users in your company, you can choose how they will be able to share their planogram projects.
- Supported values:
- Disabled: Each user (Standard User and PlanogramBuilder Administrator) can edit only his/her own projects:
- Administrators only: PlanogramBuilder Administrator can also edit projects of other users:
- Open
- Save
- Manage
- See the name of each project owner under a column labeled Owner in List of projects.
- All users: Each user (Standard User and PlanogramBuilder Administrator) can also edit projects of other users:
- Open
- Save
- Manage (only accessible to PlanogramBuilder Administrator)
- See the name of each project owner under a column labeled Owner in List of projects
- Default value: Administrators only
Notes:
- No matter the above setting, a project marked as Template can always be accessed by other users.
- No matter the above setting, a project marked as Template can only be saved by the respective owner. (To make changes to templates if you are not the owner, first uncheck Template.)
- No matter the above setting, projects marked as Locked (Project properties) cannot be saved. (To make changes to such planograms, first uncheck Locked (Project properties).)
- No matter the above setting, a project that is already opened by a user cannot be opened by another user. The project must first be closed to allow opening it by another user.
Standard users can edit bays
Enable or disable all shelving creation and editing features for Standard Users.
- Supported values:
- Checkmarked: Create bays, Modify bays and related tools can be accessed by all users, including Standard User.
- Not checkmarked: Create bays, Modify bays and related tools are hidden to standard users. Only PlanogramBuilder Administrator can create and edit shelving.
- Default value: Checkmarked
Tip: Disabling shelf editing is typically useful when one or more PlanogramBuilder Administrator(s) is (are) in charge of creating the bays and making them available to other users as or by enabling Shared projects.
Allow clear DB
Toggles the display of Clear DB button on Database toolbar.
In order to minimize the unintentional full deletion of the database content, this toggle must be checkmarked by an administrator before being able to see and use the command which actually clears the database.
- Supported values:
- Default value: Not checkmarked
Notes:
- Unlike most other settings, check marking this checkbox does not persist after closing PlanogramBuilder. It must be re-enabled at each new session.
- Consult Clear DB for instructions on deleting the database content.