Tools and commands (Database)
Several commands are available to manage your database.

PlanogramBuilder provides 2 methods to manage items in your database:
- Add items one by one with New item and define their characteristics directly in the built-in database editor in Item properties. This method is suitable if you have only a very limited set of products and accessories. It is also advised to use this method temporarily when you start using the application to get familiar with the database and the various item properties.
- Add or update items and their characteristics from a spreadsheet file with Import list + images or Import list. This method is advised if you have many products, or accessories because you can add or modify multiple items in one operation.
After you have learnt both above methods, we advise using either method 1 or method 2, but not mixing both as this could lead to discrepancies between your database content and your local file content, making it complicated to synchronize item updates.
The database toolbar also includes commands to Clear DB and to export (Export list + images, Export list) your database to local files on your PC for backup.
Consult the description of each command in the section below.
Import list + images
Note: Only available to PlanogramBuilder Administrator
Video tutorial on this topic: 9: Batch importing items in the database
This command lets you add and update items in your database from a spreadsheet file and images on your PC.
Use this command when you want to either:
- Add new items to your database, including images of the items.
- Update existing items in your database and re-upload their images. For example, if some product images have changed.
Before adding items to the database, make sure to configure the following application parameters because they will affect your database:
- Language
- Measurement unit
- Item classification properties (Settings)
- Item custom properties (Settings)
Instructions:
- To help you prepare your first spreadsheet for import, you can obtain examples as follows:
- Export your existing database (Export list + images) from PlanogramBuilder. If your database is currently empty, the exported file will be a blank template with the proper columns. If your database already contains items, the exported files will also include the existing items and their images as examples.
- If your database is currently empty, you can still download a set of files with items and images as examples: sample_files/database_import/database_import_example.zip
- Open in a spreadsheet program the Excel file obtained at step 1.
- Each line represents one product or accessory, and each column represents an item property. Please consult Item properties for a description of all the available properties.
|
Reference |
Category |
Brand |
Product line |
Name |
Width |
Height |
Image1 |
|
Behavior |
Color |
Back panel type |
|
045631 |
Beverage |
Coca-Cola |
Zero |
Coca Zero 500 ml |
6 |
20 |
045.png |
|
standard |
#ff0000 |
|
|
054256 |
Beverage |
Coca-Cola |
Cherry |
Coca Cherry 500 ml |
6 |
20 |
042.png |
|
standard |
|
|
|
136853 |
Beverage |
Sprite |
Cherry |
Sprite Cherry 330 ml |
8 |
11 |
153.jpg |
|
standard |
#6C0232 |
|
|
bjh002 |
Beverage |
Coca-Cola |
|
Coke shelf strip 80 cm |
80 |
2.5 |
002.jpg |
|
Shelf strip |
#6C0232 |
Accessory |
Example of spreadsheet for import
- If you omit some columns or leave values empty for properties which are not compulsory, default values will be applied to the item upon import.
- To import accessories, the column named Back panel type must be present in the spreadsheet with the correct values per item. Consult Type (Item properties).
- To upload images onto your items, proceed as follows:
- Consult Image for instructions on preparing your images.
- Type only the image filename and extension in the image column (e.g., myimage.png). Note: if you insert only the image filename without its extension, PlanogramBuilder will try to automatically find your image with a supported format in the following order: png, jpg, jpeg, jpe, jfif, bmp, tif, tiff, gif, tga, ico.
- Copy all the referenced image files in the folder or a sub-folder of where you saved the spreadsheet file. Note: as an alternative to copying all the images, if your images are already in a folder on a different path on your computer (but not on a network), you can create a shortcut to your existing image folder in the folder where the Excel file is located. This step is important as otherwise PlanogramBuilder won’t be able to upload the images.
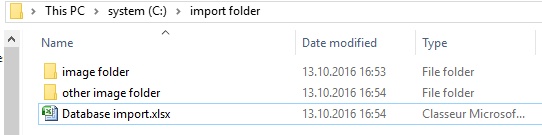
Example of suggested folder structure for database import with images
- Save your spreadsheet as an Excel file (*.xls or *.xlsx), or if you can’t save as Excel files from your application, save as a Unicode Text file (*.txt).
- In PlanogramBuilder, Database, click on Import list + images, then select the spreadsheet file you have prepared and wait for all items to be generated. PlanogramBuilder will also automatically find and upload the referenced images to the database upon import using these images.
- The status bar shows the upload progress.
- Once finished, a popup message shows a summary of what was imported, as well as the average upload speed for batches of 5 MiB and larger.
- Your items are now shown in the following panes according to their respective type:
- If you updated one or more items, they are also updated in your existing saved Projects. Note: If the updated items are present in the currently opened planogram, you must save, close and re-open this project to reflect the item modifications.
Tips:
- You can cancel Import list + images by clicking on its icon when a batch image upload is going on.
- You can use as many spreadsheet files as you want as sources for importing. Each spreadsheet can then be imported separately to add or update only some items in the database. For example:
- You may split your products by category or by brand, each in a separate spreadsheet list to facilitate managing products.
- You can create a new separate spreadsheet, containing only the new items to add at each import operation to avoid reimporting the items already in your database.
Warning: If you edit your spreadsheet in Excel, References (SKUs, Gencode or EANs) or other values expressed as long numbers or numbers starting with 0 may not display correctly. In this case, you have two solutions:
- If you want to save the file as native Excel files (xls or xlsx), set the cells containing such numbers to text so your item Reference will be displayed correctly.
- If you want to save the file as Unicode text, you can add a number sign [#] as a prefix to an item Reference. PlanogramBuilder then automatically removes the first character upon import if it’s a [#] so your item Reference will be displayed correctly in PlanogramBuilder.
E.g., A 13-digit reference code 0235485217568 is not supported as a number by Excel. So, change the containing cell to text and Excel will then display it correctly. PlanogramBuilder will therefore also display 0235485217568 in its database after import.
Notes:
- The header name of each column in your spreadsheet must match exactly each available property in database editor.
- If you have set the language of the user interface to a language other than English, the names of the database properties are displayed in the language you chose. When importing, you must also name your source spreadsheet column headers as they appear in your language in the database interface.
- You can use non-Latin characters for most text entries. For example, you can enter product names in Greek language. Consult Item properties to find out which text columns support Unicode characters.
- The order of the columns in your spreadsheet does not matter for importing, as the importer compares the header values to match columns.
- Consult the related sections for help on defining the names of Item classification properties (Settings) and Item custom properties (Settings).
- You can force a measurement unit for the dimensions of your items by adding the unit abbreviation within square brackets after the header. Here are the 4 possible options:
- No unit specified (example: Width). The unit used for import will be the current PlanogramBuilder unit. Consult Measurement unit for details on this setting.
- [mm] (ex. header: Width [mm]). The product width will be interpreted as millimeters.
- [cm] (ex. header: Width [cm]). The product width will be interpreted as centimeters.
- [inch] (ex. header: Width [inch]). The product width will be interpreted as decimal inches.
- [m] (ex. header: Width [m]). The product width will be interpreted as meters.
- Color values are specified using the corresponding HTML color code. Consult Color (Item properties).
Rule to determine if an item will be added or modified:
For each item listed in your spreadsheet, the value of Reference determines if the item will be added or updated:
- If the imported value of Reference cannot be found in your PlanogramBuilder database, a new item will be created.
- If the imported value of Reference already exists in your PlanogramBuilder database, the item will be updated to match the values from your spreadsheet.
Rules for missing columns:
When you import an item, the only compulsory column in your spreadsheet is the Reference. If you omit other columns, PlanogramBuilder fills their values according to the following rules:
- If the imported value of Reference already exists in the database and the missing column value is already defined there, the existing database value is kept unchanged.
- If the imported value of Reference already exists in the database but the missing column value is not defined there, or if the imported value of Reference doesn’t exist yet in the database, default values are applied for its properties if applicable, otherwise values are left empty.
Example: Update the names of several items that are already in the database by simply importing a spreadsheet with two columns: Reference, Name. Even if using Import list + images, the existing images won’t be changed or deleted since there is no column named Image.
Rules for empty cells:
If you leave some empty cells for an item under the columns of your input file:
- If a default value is documented in Item properties for the corresponding property, the existing database value is overwritten by the default value.
- If no default value is documented, the existing database value is overwritten by an empty value.
Examples:
- Import new items from a spreadsheet with empty cells under the column labeled Behavior. This will set all items to their default value for the following properties: Behavior (Products) or Behavior (Accessories).
- Use Import list + images to remove images from one or several products by importing a spreadsheet with empty cells for the desired items under the image column. The images will be removed for the items which have empty image cells.
- Use Import list + images to update images of products by importing a spreadsheet with new images referenced under the following properties: Image. All images referenced in your file will be re-uploaded. Tip: If you only want to update images of some products, don’t put empty cells because this would remove the images from the corresponding products. Instead, create an input file with only the lines for products that need updated images.
Import list
Note: Only available to PlanogramBuilder Administrator
This command lets you add or modify multiple items in your database in one shot. It performs the same function as Import list + images, but without uploading images of your items. Any image column present in your input spreadsheet file is simply ignored.
Use this command when you want to either:
- Add new items to your database if you don’t have images of the items. Note that you will still be able to import images later by updating the items with Import list + images.
- Update existing items in your database without re-uploading their images. For example, when you just want to change some item names or custom property values.
Example: Update several database item properties such as name, category or dimensions without re-uploading the item images. With this command, the existing images won’t be re-uploaded nor removed from the database.
Consult Import list + images for details and instructions on this command since it is the same except for images.
Export list + images
Video tutorial on this topic: 8: Exporting the database
This command exports the list of all your products and accessories, including their properties. This also exports all images stored in the database to your computer.
Use this command:
- To create a full backup of your database. We strongly advise doing regular backups so you can recover your database in case you have accidentally cleared it or deleted items.
- To obtain template files with the correct format and folder structure for Import list + images. We strongly advise taking this step before your first batch import.
- To re-synchronize your local PC source files with the most current database state. This is useful if you made manual item modifications and image uploads in Item properties after you last batch import.
The exported item list can be either in Microsoft Excel format (*.xls or *.xlsx), or in Unicode Text format (*.txt), compatible with any spreadsheet application.
The exported images are saved in the same format as they were originally uploaded.
Instructions:
- Click on Export list + images.
- In the dialog box, browse to the folder where you want to save the exported database. Tip: choose an empty folder or creating a new folder to avoid the exported files getting mixed-up with other existing files on your computer.
- Choose the file type
- Type a filename.
- Click on Save.
- Wait for all the files to finish downloading onto your computer. The first exported file is the listing of items, which is very fast to download, then the images. The status bar shows the download progress.
- Once finished, a popup message shows a summary of what was exported, as well as the average upload speed for batches of 5 MiB and larger.
Tips:
- you can abort the export process by simply clicking on Export list + images once again during the export process.
- We advise choosing the *.xls or *.xlsx format. Otherwise, if you select the *.txt format a number sign [#] is automatically added in the exported txt file as a prefix to all item References that start with a [0] or that are large numbers (more than 11 digits). This convention is a work-around to display these numbers correctly if you open the exported list in Excel, which doesn’t support long numbers.
Notes:
- The images are saved in a new folder named images. Images can take a long time to export depending on the number of images, their size and the speed of your Internet connection.
- The dimensions of your items (width, depth and height) are exported in the current active measurement unit. Consult Measurement unit for details on setting this preference.
Export list
This command exports the list of all your products and accessories, including their properties, from your PlanogramBuilder Database to your computer. It performs the same function as Export list + images, but without saving the images of your items.
Use this command to export your database when you don’t need the images, typically in case you already have all the current database images of your items on your PC.
Consult Export list + images for details and instructions on this command since it is the same except for images.
Clear DB
This command deletes all the database content: all your products and accessories.
Notes:
- Only available to PlanogramBuilder Administrator
- Only available if Allow clear DB is checkmarked in the application settings.
Instructions:
- Checkmark Settings > Allow clear DB.
- Click on Clear DB.
- Then confirm by clicking OK.
- Once completed, your database is completely empty.
Warning: All your products and accessories will be permanently deleted from the database and cannot be recovered after this operation. Make sure to at least back up your database before clearing the database. Please consult Export list + images for instructions to back-up.
New item
Note: Only available to PlanogramBuilder Administrator
Video tutorial on this topic: 5: Adding your first product to the database
Video tutorial on this topic: 7: Adding accessories to the database
This command creates a single new item in your database. The type of item created depends on your current choice of Type of items: Products or Accessories.
Use this command in the following cases:
- To learn using the database, especially Item properties.
- To add items one by one if your database has a very small number of items.
In all other cases, we suggest rather using Import list + images to add several items quickly. Mixing both the single item and the batch import method is not a good idea as it can lead to discrepancies between your database content and your local file content, making it complicated to synchronize item updates.
Before adding items to the database, make sure to configure the following application parameters since they will affect your database:
- Language
- Measurement unit
- Item classification properties (Settings)
- Item custom properties (Settings)
Instructions:
- On the left of the database list in Content choice, set the value of Type of items to match what you want to create: Product or Accessory.
- Click on New item.
- Under Item properties on the right of your screen, define the properties of your new item. Please consult Item properties for a detailed description of each available property.
- Once you have entered all the desired values, click on Create below the properties to validate the creation of your new item. (You can also press Enter on your keyboard.) Otherwise, if you have changed your mind and don't want to create the new item, click on Cancel (database item) (or the Escape key).
- Your items are now shown in the following panes according to their respective type:
Delete (database item)
Note: Only available to PlanogramBuilder Administrator
Deletes the item(s) selected in the list.
- Keyboard shortcut: Del
A confirmation message box will pop up to confirm deletion.
Warning: deleted items cannot be recovered unless you had previously made a local backup of the database (consult Export list + images).