Project management
The project pane lets you access and manage all your saved projects.

There are 2 ways to open the pane of project management:
- Click on Manage in Project commands (main window) to open the project pane with all its management features enabled.
- Click on Open in Project commands (main window) to open the project pane with features limited to the following:
- List of projects
- Some commands for projects: Open, Insert (project)
- Project thumbnail
The Project pane features are described below.
List of projects
The list of projects displays all your projects.
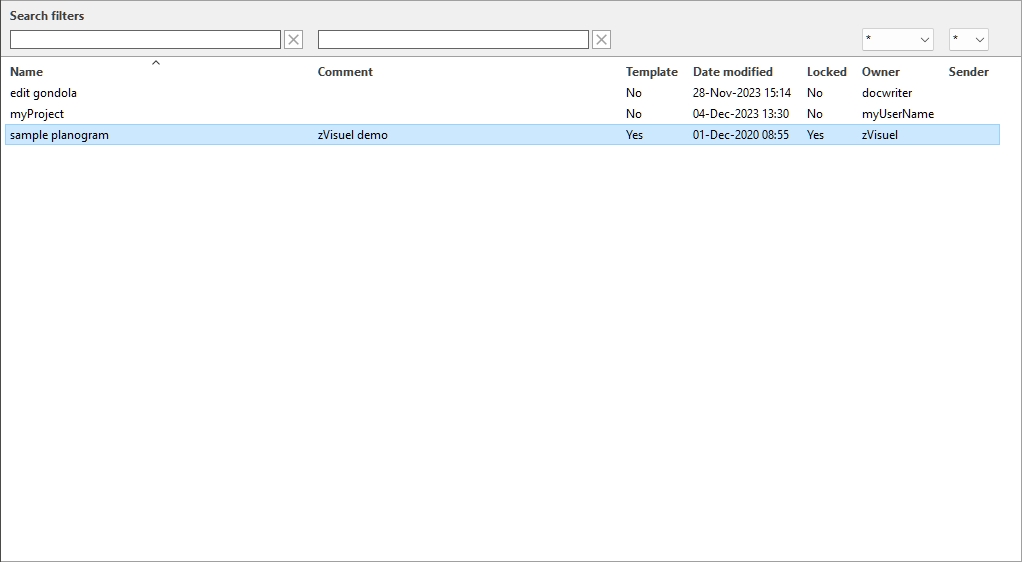
There is one line per project and several columns showing various attributes of the projects:
- Name (Project properties)
- Comment
- Project classification properties (Level 1, Level 2, Level 3)
- Template
- Date modified: the date and time the project was last saved
- Locked (Project properties)
- Owner : the user who last saved the project
- Sender : the user who last sent the project to you. For details on sending projects to the users, cf. Send.
A maximum of 50 projects is shown on each page. If there are more than 50 projects, they are displayed on additional pages. To select another page to display, use the page navigation tools in the lower left corner of the list:
- Display a specific page: click on one of the 10 visible page numbers.
- Display the previous or next page: click on the left or right arrows (shortcut keys: Left / Right arrows).
- Display the previous or next set of 10 pages: click on the left or right 3 dots.
Note: If your screen is small, scroll down to see more items.
Search filters
You can type keywords in the filter text fields to display only projects matching specific criteria. The text filters accept single or multiple keywords following these rules:
- Keywords are not case sensitive.
- Multiple keywords must be separated by spaces.
- Multiple keywords search for values containing all the keywords.
- The order of keywords doesn’t matter.
There are also drop-down lists which let you filter them by Project classification properties, Owner and Sender.
Example: enter 2025 campaign in Name filter box to display all the projects containing the following text in their name: 2025 and campaign.
To clear a text filter, click on the corresponding Clear button (red cross). To clear a drop-down filter, select the asterisk in the list.
Note: The column and filter named Owner are only visible if Shared projects is activated.
Project sorting
Click on the headers at the top of each column to sort the projects according to the column content.
For example:
- To order the list by project names, click on Name.
- To order it by most recent modification dates, click on Date modified.
When you click again on the header, the order is reversed.
Note: The last-used sort criteria and sort direction persist for your next session.
Project selection
You can select one or several projects in the list for further processing or to modify its / their properties.
To select 1 project:
- Click on the desired project to select it in the list. It becomes highlighted.
Advice: You can switch the selected project in the list to the one above or below with the Up and Down arrow keys on your keyboard.
To select multiple projects, there are 2 methods:
Note: multi-selection is only available with: Manage, not with Open.
- Method 1:
- Click on a project in the list to select it.
- Hold the Ctrl key and click on another project to select it.
- Repeat the above step to select additional projects.
- Method 2:
- Click on the first desired project in the list.
- Hold the Shift key and click on the last desired project in the list.
- All the projects listed from the first to the last one selected are also selected.
- You can select additional projects using method 2.
To deselect projects:
- Use the above methods to click again on the selected project(s) that you want to deselect.
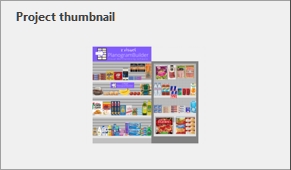
Project thumbnail
When a single project is selected, a small preview is displayed to help you identify the project.
Project properties
Note: project properties are only available with: Manage, not with Open.
The right side of the project management pane lets you view and edit the properties of the selected project(s).
Note: standard users (cf. Standard User) can only manage their own projects. Administrators (cf. PlanogramBuilder Administrator) can change the properties of projects even if they are not the owners.
Advice: If you have selected multiple projects, you can assign them the same values for any property. It is however not recommended to assign the same name to several projects.
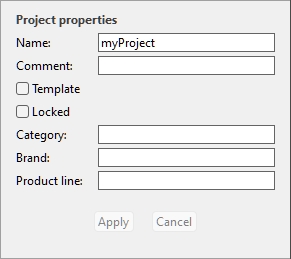
Name (Project properties)
Sets the name of the selected project(s).
- Supported values: text, including Unicode characters for non-Latin text values
- Default value: the name you assigned when you saved the project (Save or Save as).
- Example: my best planogram
Instructions:
- Select one of your own projects in the list.
- Enter or edit the value.
- Click on Apply (Project properties) to apply your changes.
Note: standard users can only change the name of their own projects. They can still read the name of all the listed projects. PlanogramBuilder Administrators can rename projects even if they are not the owners.
Comment
Sets a comment about the selected project(s) (e.g., client name, internal version, etc.).
- Supported values: text, including Unicode characters for non-Latin text values
- Default value: empty
- Example: special Promo display
Instructions:
- Select one or several of your own projects in the list.
- Enter or edit the value.
- Click on Apply (Project properties) to apply your changes.
Note: standard users can only change the comment of their own projects. They can still read the comment of all the projects listed. PlanogramBuilder Administrators can edit the comment of any project even if they are not the owners.
Template
Toggles the selected project(s) as template.
Templates are a special type of projects which can be re-used as a basis for new projects or to combine into other planograms. They are especially useful for often-used empty shelving or guideline planograms. Template projects are accessible to all users in your company in List of projects and in Template catalog, for easy drag and drop into any Planogram.
- Supported values:
- Yes (checkmarked in the GUI): the project is a template.
- No (not checkmarked in the GUI): the project is not a template.
- Default value: No (not checkmarked in the GUI)
Instructions:
- Log in as PlanogramBuilder Administrator.
- Select one or several of your own projects in the list.
- Checkmark or uncheck Template.
- Press Apply (Project properties) to apply your changes.
Notes:
- Only PlanogramBuilder Administrator can assign projects as templates.
- Only the template owner can modify and save an existing template project content. Non-owners can open templates belonging to another user, but they must save them under another project name (Save as). This prevents users from inadvertently changing the original template.
Locked (Project properties)
Toggles the selected project(s) as locked.
- Supported values:
- Yes (checkmarked in the GUI): the project is locked. Use this to prevent modifying the project, for example once it has been finalized. Once locked:
- Save is disabled for this project. It can still be opened, edited, and saved as a copy, but modifications cannot be saved over the existing project.
- Nobody can Delete (project).
- No (not checkmarked in the GUI): the project is not locked. It can be saved and deleted.
- Default value: No (not checkmarked in the GUI)
Instructions:
- Select one or several of your own projects.
- Checkmark or uncheck Locked (Project properties).
- Press Apply (Project properties) on the toolbar to apply your changes.
Notes:
- Standard users can normally only lock and unlock their own projects. PlanogramBuilder Administrators can lock and unlock any project even if they are not the owners.
- If Shared projects is activated, PlanogramBuilder Administrator can unlock a project. Other users can't unlock it, even the original user who set the project as locked.
Project classification properties
Three fields let you optionally classify your projects (Level 1, Level 2, Level 3). The actual names of these fields varies depending on your settings. To configure them, cf. Project classification properties (Settings).
Assigning classification values is useful to sort and find your projects in List of projects.
For Templates, it also helps users find them in the catalog (Template catalog) which reflects this classification.
Instructions:
- Select one or several of your own projects.
- Enter or edit the values.
- Click on Apply (Project properties) to apply your changes.
Note: standard users can only change these values for their own projects. PlanogramBuilder Administrators can change the values of any project even if they are not the owners.
Apply (Project properties)
Applies the changes made to the selected project in Project properties.
You must press this button after you have made one or more modifications to project properties.
Note: updated values are only applied to projects and properties which the user has the right to change (cf. Project properties). Other projects and values are left unchanged.
Cancel (Project properties)
This cancels unapplied changes you made to the project properties.
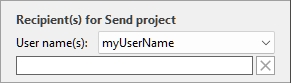
Recipient(s) for Send project
This is where you can choose the recipient(s) to send the selected project(s) to.
For instructions, cf. Send.
Tools and commands (Project management)
The toolbar on the bottom contains various buttons described below.

Open
Opens the selected project for viewing and editing. The newly opened project replaces the previously opened planogram project.
Note: only one project must be selected in the list to be able to open it.
Advice: You can use the Enter key to open the selected project.
Insert (project)
Inserts the project selected in the list into the currently opened project.
This is a simple and powerful feature which lets you combine several planogram projects, for example to create a complete store aisle from smaller sections, or even a complete store.
You can insert as many projects as you wish into your current planogram project.
Instructions:
- Find the desired project in the list.
- Click on Insert. The list of projects is closed and a special cursor appears.
- Drag the cursor to the desired insertion location in the visualization area.
- The content of the selected project is added to your current planogram.
- Select and re-position the inserted elements where you want if necessary.
- Repeat the above steps to insert more projects into your planogram.
- Save your project (or save as… if you don't want to overwrite your initial project).
The way projects are placed depends on the state of the button named Free bay placement:
- With Free bay placement not checkmarked:
- If there is no existing bay in your project: the inserted project is centered on the ground.
- If there are existing bays in your project:
- The inserted bays are placed adjacent to the existing bays, based on the cursor position: left, right or in-between, pushing other bays to make space in this last case.
- With Free bay placement checkmarked: inserted project is placed at the cursor position on the ground. If there are other objects at this position, they may overlap.
Notes:
- Only one project must be selected in the list to use this command. You can however repeat the command to insert several projects sequentially.
- If Free bay placement is not activated for your current project and you add another project (with Free bay placement), Free bay placement will automatically be activated for the current project to maintain the positioning the merged shelving.
- The project inserted into the current project is placed as an independent copy of the original project retaining no link with it. This means that if you make changes to your current planogram after having inserted another project, your changes only affect your current project, not the original inserted project.
Advice: For projects which you often insert into other planograms, activate Template so they will be displayed in the template catalog, for convenient drag and drop insertion.
Delete (project)
Deletes the project(s) selected in the list.
- Keyboard shortcut: Del
A confirmation message box will pop up to confirm deletion.
Note: only the projects which the user has the right to delete are deleted. The currently opened project and The following projects cannot be deleted:
- The currently opened project. Click on New (Projects) to close the current project; then you can delete it.
- Locked (Project properties). Unlock these projects, then you can delete them.
Warning: deleted projects cannot be recovered unless you had previously made a backup (Backup).
Send
Sends an independent copy of the selected project(s) to one or several other PlanogramBuilder user(s) in your company.
Instructions:
- Select the project(s) to send in the list.
- On the right of the screen, below Recipient(s) for Send project, in the drop-down list next to User name(s), select the destination user(s). To select several recipients, just pick them one by one in the list. They will be added to the text field just below.
Advice: If you or your colleagues don’t know your username, you can find it at the upper right of the work screen as shown here: Screen Layout.
- Click on Send.
- When the operation is complete, you will see a confirmation message in the bottom toolbar. The project automatically becomes available in the list of projects of the destination user(s) for opening and editing.
Notes:
- Projects sent to other user(s) are independent copies of the original project, retaining no connection to it. If you wish other users to see the evolution of your project, send the project again after changes, or use other methods to share projects (cf. Template and Shared projects).
- Note: only the projects which the user has the right to delete are deleted. The currently opened project cannot be sent either. Close it with New (Projects) before sending it.
Backup
Note: Only available to PlanogramBuilder Administrator
PlanogramBuilder lets you create a local backup of your projects. The backup includes all projects from all users in your company.
To back up your planogram projects, follow these steps:
- Click on Backup. This opens a file save dialog.
- Choose a local folder, optionally change the suggested file name and the Excel file format.
- Click Save to create the backup Excel file.
Restore
Note: Only available to PlanogramBuilder Administrator
PlanogramBuilder lets you restore projects from an existing local backup. The process restores all the projects listed in the file.
To restore your planogram projects, follow these steps:
- Click on Restore. This opens a file open dialog.
- Choose the folder, then the Excel file to restore.
- Click Open to restore the projects.
What happens exactly when you restore projects:
- Projects listed in the input file that don’t exist in your project list are added to your project list. This is typically the case with projects that were deleted after your last backup.
- Projects listed in the input file and that already exist in your project list overwrite the respective projects in your project list. Any changes made after the date of the input backup file will be lost.
- Projects that already exist in your project list but not listed in the input file are left in your project list. No project is deleted.
Editing the Excel input file (advanced users only):
Restore must always use as a base an input file created with the following command: Backup. A backup contains all the previously saved projects, but you can edit the Excel file to update some project information and to remove any project that you don’t want to restore. To do such, open the input file in your spreadsheet application and optionally do the following:
- Delete one or several lines to prevent restoring some project(s). This way you can keep only the lines corresponding to the project you want to restore. Warning: very large projects can be on multiple lines. In this case, keep together the line(s) with checksum 0 with the last line (showing a different checksum) of the project.
- Edit values in any of the following column: Name, Comment, Date Created, Date modified, Template, Locked (Project properties), Owner, Sender, Project classification properties. If you change values in these columns, make sure to use the exact same format as the existing other lines and enter values that make sense. For example, don’t enter a non-existing username under Owner.
- Important: Never edit the following columns: Project #, Data, Checksum.
- Use Save As… (not Save) and enter a different name for the edited file to restore, to save your modified file in Excel: this way you will still have the original backup file.
Important Advice: Before restoring projects, make sure to create a backup so you can revert in case something goes wrong.
Advice: Before you restore projects, make sure to display the projects of all users in your project list. To do so, enable Shared projects (if you are an administrator).
Close
Closes the Project management pane.
- Keyboard shortcut: Esc (only works before using your mouse on any user interface element of the pane)