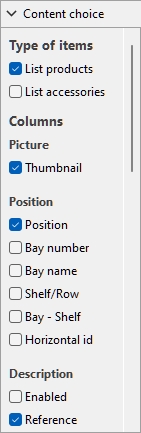
Content choice (Project item list)
This menu on the left of the list header bar lets you configure what is displayed in the list, as well as the grouping and highlighting of items.
To display this pane:
- Click on the right-pointing arrow next to Content choice.
- The pane is now displayed.
To hide this pane:
- Click on the down-pointing arrow next to Content choice.
- The panel is now hidden.
Type of items (Project item list)
This section lets you choose which type(s) of items you want displayed in the list.
List products
Toggles the display of products in the list.
- Supported values:
- Checkmarked: products are displayed in the list.
- Not checkmarked: products are not displayed in the list.
- Default value: Checkmarked
List accessories
Toggles the display of accessories in the list.
- Supported values:
- Checkmarked: accessories are displayed in the list.
- Not checkmarked: accessories are not displayed in the list.
- Default value: Not checkmarked
Columns
This section lets you choose which item properties you want to see listed as columns in the list.
For each property displayed in the list as a column, the value is shown for each product or accessory. Totals per group and per project are also shown when possible for numeric and percentage values.
All the available choices are in the form of checkboxes which toggles the display of the corresponding values in the list.
- Supported values:
- Checkmarked: the corresponding values are displayed in the list.
- Not checkmarked: the corresponding values are not displayed in the list.
- Default values: based on your last choices
Notes: if some columns don't fit in the list pane, you can use the horizontal scrollbar to view them.
The following groups of properties and values are available:
Picture
Thumbnail
A thumbnail image of each item in the list. Thumbnails can help identify each product visually in the listing.
The thumbnail size is adjusted based on your choice of Font height.
Position
Position
A unique number from 1 to n for each product listed. Numbering is based on each item physical location with the following rules:
- On each bay, numbering is ordered from the left-most product on the highest shelf/row to the right-most product on the lowest shelf/row.
- If items are grouped in the list by Bay number or by Bay name, item numbering restarts from 1 at each bay (consult Group by).
- If items are not grouped or grouped by any other property in the list, a unique number is assigned to each item in the project. In this case numbering starts from items on Bay number 1 and ends with those on the last bay number in the planogram.
Tip: To quickly find the position of each product in the visual area or in published images, the Position column can be combined with matching number labels on the products in Schematic view (View).
Bay number
A unique number assigned to each bay. Numbering starts from the left-most bay and ends with the right-most bay in the planogram as seen from the front.
Bay name
The name of each bay as defined in Bay name. If no name is defined for a given bay, its name is displayed in the item list as Bay [Bay number], for example Bay 7.
Shelf/Row
A number from 1 to n representing on which shelf or row each product is placed.
Notes:
- Numbering starts from the top and ends at the lowest row or shelf of each bay.
- Even empty shelves are numbered.
Bay - Shelf
This provides a more compact version of item position, combining Bay number + Shelf/Row. For example, 2 - 5 means the item is on Bay 1, shelf 5.
Horizontal id
A number from 1 to n representing the order of each item from left to right on its shelf / row.
Notes:
- All items stacked vertically in a same stack have the same Horizontal id.
- Any product placed several times side by side and with the same values for Facings high account for a single horizontal ID. In this case Facings wide is set to the number of adjacent piles of the item.
Description
A [A: Classification - level 1]
B [B: Classification - level 2]
C [C: Classification - level 3]
Item custom properties [1 – 12]
Consult the above links for details.
Dimensions
Consult the above links for details.
Appearance
Consult the above link for details.
Type (Project item list)
Type
The type of item, either Product or Accessory, based on the type defined in the database for each item.
Consult the above link for details.
Arrangement
Lateral offset (Item properties)
Consult the above links for details.
Facings
Consult the above links for details.
The totals are computed per block of same products, according to the following rules:
- Adjacent same products part of a same product block (single selectable entity) are grouped on one line with the total quantity for the block.
- Adjacent same products part of separate blocks (multiple entities) are shown on separate lines in the list with the totals per line.
- Different products stacked vertically are listed on distinct lines.
Used space
The columns described below let you display the space used by products in your project.
Note: the following values are computed based on the space taken by each product block including the gaps between products if any. For example, a product measuring 10 cm wide × 8 cm high placed twice in width and twice in height, with a gap of 1 cm in width results in this front surface:
((10 cm × 2 + 1 cm) × (8 cm × 2)) = 336 cm2
Linear space [Measurement unit]
The width used by each block of same products on the shelving.
Values are expressed in the measurement unit selected in Measurement unit.
- For products on shelf: the width of each block of products. (Each row uses the same shelf, so we count only the base row of the stack as using linear space.)
|
|
|
|
+ |
Width gap × (Facings wide -1) |
|
= |
Linear space [Measurement unit] |
- For pegged products: the width of each block of products × the quantity of products in height. (Each row uses a separate hole on the back panel, so we count each row as using linear space)
|
|
|
|
+ |
Width gap × (Facings wide -1) |
|
= |
Sub-total |
|
× |
|
|
= |
Linear space [Measurement unit] |
Linear space [%]
The width used by each block of same products, expressed in percentage of the total space used by products in the project.
- For products on shelf: the width of each block of products.
- For pegged products: the width of each block of products × the quantity of products in height.
|
|
Linear space [Measurement unit] (current block of products) |
|
/ |
Linear space [Measurement unit] (current project) |
|
= |
Linear space [%] |
Front surface [Measurement unit2]
The front area (width × height) used by each block of products.
Values are expressed in the measurement unit selected in Measurement unit.
|
|
|
|
+ |
Height gap (effective gap) × (Facings high -1) |
|
= |
Sub-total |
|
× |
|
|
= |
Front surface [Measurement unit2] |
Front surface [%]
The front area (width × height) used by each block of products, expressed in percentage of the total area used by all products in the project.
|
|
Front surface [Measurement unit2] (current block of products) |
|
/ |
Front surface [Measurement unit2] (current project) |
|
= |
Front surface [%] |