Camera
In this section we explain how to navigate in the visualization area.
Many actions to manipulate the viewpoint can be performed interactively with the mouse: Tools and commands (Camera).
Additionally, you can set, save and retrieve viewpoints and their precise values in a dedicated pane: Camera parameters.
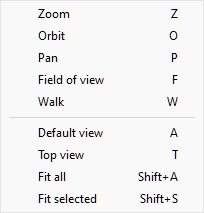
Tools and commands (Camera)
The toolbar includes common tools and commands to navigate in the visualization area:

These and additional related commands are available in Main Menu > Camera:
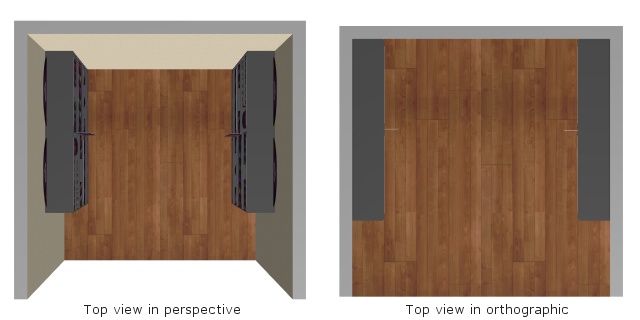
Orthographic view
Toggles a viewing mode which removes any perspective effect: this is called an orthographic view.
- Keyboard shortcut: H
- Supported values:
- Pressed (checkmarked): the planogram is displayed in orthographic mode.
- Not pressed (not checkmarked): the planogram is displayed in perspective mode.
- Default value: Not pressed (not checkmarked)
Tips:
- Combine Orthographic view with Default view to obtain a 2D front view of your planogram.
- Combine Orthographic view with Top view to obtain a 2D plan view of your planogram.
Note: you can also set Orthographic view in Camera parameters.
Example of Orthographic view: checkmarked
Example of Orthographic view: not checkmarked
Zoom
This tool lets you zoom in and out in the visualization area.

- Keyboard shortcut: Z
Instructions:
Method 1: dedicated tool mode
- Activate the tool with its button, menu item or keyboard shortcut.
- Then do one of the following:
- While holding the left mouse button down in the visualization area, move the mouse up to zoom in, or down to zoom out. This provides a progressive zoom control.
- Left click on a point in the visualization area. Each click achieves an incremental zoom targeting the point you clicked. Use Shift + click to zoom out by increments.
- Switch to another tool after you have finished zooming.
Method 2: temporary mode
You can also zoom in and out without activating the tool. This method provides a convenient temporary zoom while keeping any other tool active, such as editing tools:
- scroll your mouse wheel in the visualization area.
Note: When you zoom in, the scene is centered on the location of your mouse pointer.
Advice: to zoom slower, hold Space bar while zooming.
Orbit
This tool lets you rotate the scene viewpoint.

- Keyboard shortcut: O
Instructions:
Method 1: dedicated mode
- Activate the tool with its button, menu item or keyboard shortcut.
- Then do one of the following:
- While holding the left mouse button down in the visualization area, move your mouse in the direction you wish to rotate until you reach the desired viewing angle. This provides a progressive rotation control.
- Left click on any facet of an object in the visualization area. The viewing angle is adjusted to become perpendicular to the clicked facet.
- Left click on an empty area in the visualization area. The viewing angle is reset to the front view.
Method 2: temporary mode
You can also pivot the view without activating the tool. This method provides a convenient temporary orbit while keeping any other tool active, such as editing tools.
- Press the Ctrl key and hold it down during the next steps.
- Do one of the following:
- While holding the mouse middle button down, drag the mouse within the visualization area.
- Middle Click on any facet of an object in the visualization area. The viewing angle is adjusted to become perpendicular to the clicked facet.
- Middle click on an empty area in the visualization area. The viewing angle is reset to the front view.
Note: The scene rotates around the position of your mouse pointer.
Tips:
- To pivot slower, hold Space bar while pivoting.
- You can also set the orientation of the viewpoint precisely. cf. Direction (Camera parameters).
Pan
This tool lets you shift the viewpoint left, right, up or down.
- Keyboard shortcut: P
Instructions:
Method 1: dedicated mode
- Activate the tool with its button, menu item or keyboard shortcut.
- Then do one of the following:
- While holding the left mouse button down in the visualization area, move your mouse in the direction you wish to shift the view. This provides a progressive pan control.
- Left click anywhere in the visualization area. The viewpoint is instantly centered on the point you clicked.
Method 2: temporary mode
You can also pan the view without activating the tool. This method provides a convenient temporary pan while keeping any other tool active, such as editing tools:
- Press the Ctrl key and hold it down during the next steps.
- Then do one of the following:
- While holding the mouse middle button down, drag the mouse within the visualization area to pan.
- Middle Click anywhere in the visualization area. The viewpoint is instantly centered on the point you clicked.
Advice: to pan slower, hold Space bar while panning.
Field of view (tool)
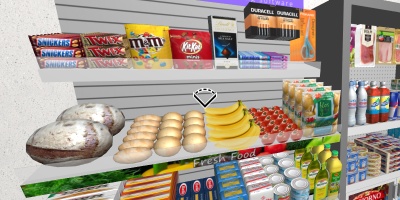
This tool lets you increase and decrease the perspective effect (FOV) in the visualization area. It is like changing the focal length of a lens on a real camera.
Keyboard shortcut: F
Instructions:
- Activate the tool with its button, menu item or keyboard shortcut.
- While holding the middle mouse button pressed, move your mouse up or down until you are happy with the perspective.
Notes:
- While the tool is active, you can click on the visualization area to reset its value to a default value.
- The default value is also automatically reset when closing PlanogramBuilder.
Advice: you can also set a precise field of view value here: Camera parameters.
Walk
This tool lets you move your viewpoint in the visualization area as if you were walking in the store.
- Keyboard shortcut: W
Instructions:
Method 1: mouse navigation
- Activate the tool with its button, menu item or keyboard shortcut.
- While holding the middle mouse button pressed, move your mouse in the direction you want to walk:
- Move forward: mouse direction up
- Move backwards: mouse direction down
- Turn left: mouse direction left
- Turn right: mouse direction right
- Once you have reached the desired direction and speed, hold the mouse at the same location to maintain the speed and direction.
- Move the mouse in the desired direction when you want to adjust direction or speed.
- To look up or down, press the left, then the right mouse buttons and hold both down. You can also use method 2 below.
Method 2: keyboard navigation
- Activate the tool with its button, menu item or keyboard shortcut.
- Use the following keyboard keys to walk:
- Turn left: Left arrow
- Turn right: Right arrow
- Move forward: Up arrow
- Move backwards: Down arrow
- Look up: Space bar + Up arrow
- Look down: Space bar + Down arrow
Notes:
- As soon as you click on this tool, the viewpoint is automatically relocated to match an average human eye level and sight angle.
- The default eye level can be defined in Eye level for Walk.
Tips:
- To walk slower, hold the Space bar while walking.
- You may want to widen the field of view for a more lifelike experience when walking (Field of view).
Default view
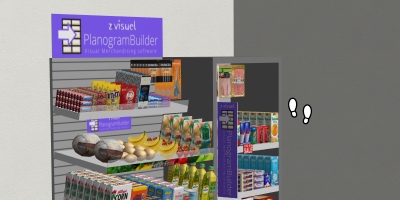
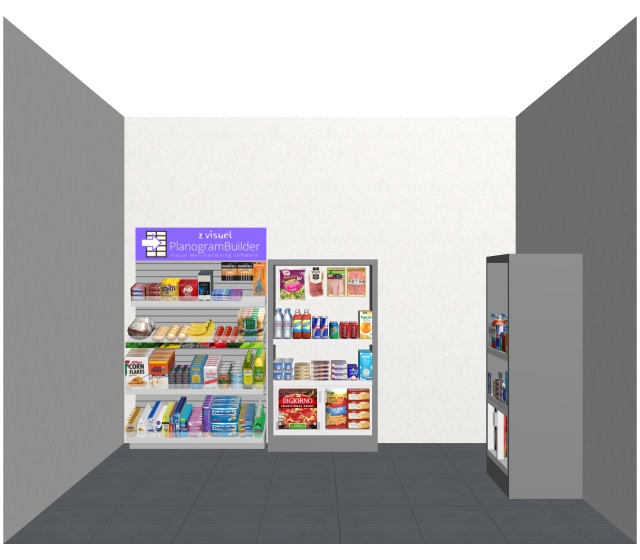
This command resets the visualization area to a predefined view which fits all the visible elements in your planogram.
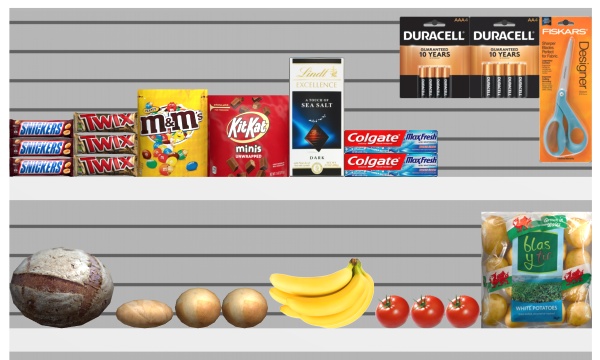
This default view varies depending on which task is active when you apply the command:
- In the task named Room, your planogram is shown from the front looking downwards to facilitate room creation and edition, as in the example below:

- In other tasks, your planogram is shown straight from the front, as in the example below:
- Keyboard shortcut: A
Top view
This command shows all your planogram elements in a plan view.
Keyboard shortcut: T
Fit all
This command zooms the view to show the whole planogram content, while retaining the current viewing angle and field of view.
- Keyboard shortcut: Shift + A
Fit selected
This command zooms the view onto the selected planogram elements, while retaining the current viewing angle and field of view.
- Keyboard shortcut: Shift + S
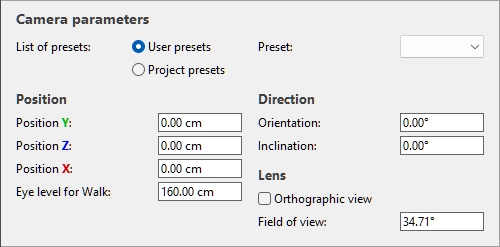
Camera parameters
This panel gives access to precise control of the camera in the visualization area.
Here, you can change and save the current point of view, as well as apply a previously saved viewpoint.
Presets (Camera parameters)
List of presets (Camera parameters)
Camera presets allow you to save and retrieve saved viewpoints.
Two lists of presets are available for you to save and load presets:
- User presets: this list saves viewpoints per user. The presets saved here are available to you with any planogram project. Use this list to save viewpoint that you will re-use across several planograms. Note that a saved camera can still zoom in or out automatically to fit the whole planogram on screen. cf. Create a preset (Camera parameters).
- Project presets: this list saves viewpoints within the current project. The presets saved here are only available with the project they are saved in. Use this list to save cameras that you only use for one project. You can save and reload several viewpoints, which makes it convenient to switch between predefined views in a complex planogram, for example, a complete store.
Preset (Camera parameters)
A drop-down list where you can select a saved preset. If a saved preset is currently used, its name is displayed.
The content of the drop-down list depends on which preset list you selected. cf. List of presets (Camera parameters).
Create a preset (Camera parameters)
- Adjust the camera to the desired viewpoint, using Camera or Current camera parameters.
- Right-click anywhere within the camera parameter panel.
- In the context menu, choose Presets > Save as.
- Select in which list of presets you want to save your new preset.
- Type the name of the preset to save in the text box.
- Optionally, check Fit all:
- Checkmarked: this saves the current viewing orientation, the field of view angle and the value of orthographic toggle. However, when loading such saved preset, the view is reframed (zoomed in or out) to display the entire planogram on screen. When saved in the list named User presets, this is very convenient to view multiple planograms from a repeatable viewing angle.
- Not checkmarked: this saves all the camera parameters in the preset. Reloading such preset applies the exact viewpoint, including the distance to the planogram objects. Use this to save a precise viewpoint which you want to reuse.
- Click Save.
- The saved preset is now available in the drop-down list.
Apply a preset (Camera parameters)
- Choose the desired list of presets.
- The corresponding available saved presets are shown in the drop-down list.
- Select a preset in the drop-down list to load it.
- The viewpoint changes to match the loaded preset.
Delete a preset (Camera parameters)
- Choose the desired list of presets.
- The corresponding available saved presets are shown in the drop-down list.
- Select a preset in the drop-down list to load it.
- Right-click anywhere within the camera parameter panel.
- In the context menu, choose Presets > Delete.
Current camera parameters
The bottom area of the panel lets you display and edit the current camera parameters.
Position (Camera parameters)
Position Y (Camera parameters)
The position of the camera on the Y axis (lateral position) in the current measurement unit.
- Supported values: positive/negative numeric value [+-0-9 and decimal point]
- Default value: 0
- Example: 100
Advice: The position can also be defined with the mouse. cf. Tools and commands (Camera).
Position Z (Camera parameters)
The position of the camera on the Z axis (height position) in the current measurement unit.
- Supported values: positive/negative numeric value [+-0-9 and decimal point]
- Default value: 0
- Example: 140
Advice: The position can also be defined with the mouse. cf. Tools and commands (Camera).
Position X (Camera parameters)
The position of the camera on the X axis (depth) in the current measurement unit.
- Supported values: positive/negative numeric value [+-0-9 and decimal point]
- Default value: 0
- Example: -200
Advice: The position can also be defined with the mouse. cf. Tools and commands (Camera).
Eye level for Walk
The height of the camera for Walk. Useful for example to simulate a child’s eye level.
- Supported values: positive numeric value [0-9 and decimal point]
- Default value: 160 cm, 1600 mm , 62.99 inches, 1.6 m (according to Measurement unit)
- Example: 140
Note: cf. Walk to learn how to use the navigation tool.
Direction (Camera parameters)
Orientation (Camera parameters)
The rotation of the camera in degrees around its vertical axis (Z) (also called camera yaw).
- Supported values: positive/negative numeric value between -180 and 180 [+-0-9 and decimal point]
- Default values: 0 (the camera looks towards the front of the planogram)
- Example: -90 (the camera looks towards the left side of the planogram)
Advice: The orientation can also be defined with the mouse. cf. Orbit.
Inclination (Camera parameters)
The angle of the camera in degrees around the horizontal axis (Y) (also called camera pitch).
- Supported values: positive/negative numeric value between -90 and 90 [+-0-9 and decimal point]
- Default value: 0 (the camera aims from the horizon level)
- Example: 90 (the camera aims from the top)
Advice: The inclination can also be changed with the mouse. cf. Orbit.
Lens (Camera parameters)
Orthographic view (Camera parameters)
This performs the same function as the button named Orthographic view.
Field of view (Camera parameters)
Note: This parameter is only available in perspective view (Orthographic view not checkmarked).
The opening angle of the camera field of view (FOV) in the visualization area. It is like changing the focal length of a lens on a real camera.
- Supported values: positive numeric value between 11.42° and 126.87° [+-0-9 and decimal point]. A lower value corresponds to a narrower field of view. A higher value results in a wide-angle camera.
- Default value: 34.71°
- Example: 65
Advice: The field of view can also be defined with the mouse. cf. Field of view (tool).
Scale (Camera parameters)
Note: This parameter is only available with the following parameter active: Orthographic view.
This value reflects the magnification of the camera.
- Supported values: positive percentage value between 0.01% and 2000%. A lower value corresponds to a smaller scale. A higher value results in a higher magnification.
- Default value: N/A
- Example: 32.5%
Advice: The camera scale can also be defined with the mouse. cf. Zoom.