Projects
Projects are planograms created and saved in PlanogramBuilder native format. They can be opened and edited only in PlanogramBuilder.
Your planogram projects are stored on our remote servers. This lets you log into PlanogramBuilder from any computer and always access all your projects.
In this section we explain how to open, save, combine, share and manage your planogram projects.
Project commands (main window)
The toolbar on the main application window contains often used commands for projects. It is always visible in PlanogramBuilder:

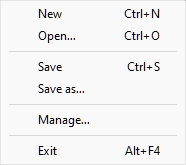
These commands are also available in Main Menu > Project:

New (Projects)
This command creates and opens a new empty project.
- Keyboard shortcut: Ctrl + N
Use this command:
- When you want to start a new planogram project.
- To close an opened planogram project without exiting the application.
Note:
After creating a new project, PlanogramBuilder automatically activates a task typically used when starting a planogram:
- If you have not previously saved any Templates or if Create bays is already active, this task will be activated so that you can start adding new shelving.
- Otherwise, the task for Templates will be automatically activated, so that you can start dragging these to your new project.
Open
Opens the pane of Project management showing the list of projects available to open.
- Keyboard shortcut: Ctrl + O
You can close the pane with the Cancel button (or with Esc key, but only before using your mouse on any user interface element of the pane).
Save
Saves the opened project under its original name.
- Keyboard shortcut: Ctrl + S
Use this command to save your latest changes to an existing planogram project.
Note: This command is not available when saving a new project for the first time. In that case you must first use Save as to save and assign a name to your new project.
Tip: You can see if your current project has been modified since it was last saved by the asterisk (*) symbol appended to the project name in the upper toolbar (consult the image of Screen Layout).
Save as
Saves the opened project under a new name.
Use this command:
- To save and name a new (not yet named) planogram project.
- To save a copy of an existing project under a different name.

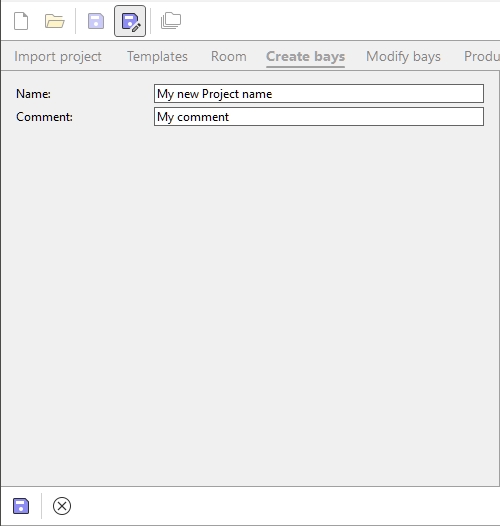
Instructions:
- Open a project or create a new one.
- Click on Save as.
- Type a name for the project and optionally a comment (such as your client’s name) in Comment.
- Click on Save in the bottom toolbar or press Enter on your keyboard.
- When the operation is complete, you will see a confirmation message in the bottom toolbar. The project automatically becomes available in the list of projects.
- Once the current project has been saved, its new name appears at the top of the work screen.
You can close the pane with the Cancel button (or with Esc key, but only before using your mouse on any user interface element of the pane).
Manage
Opens the pane of Project management showing the list of projects available to manage.
Use this command to manage your existing projects (rename, delete, etc.).
Exit
Closes PlanogramBuilder.
- Keyboard shortcut: Alt + F4
You can also close the application with the standard cross at the upper left corner of the window.