Parameters (Create bays)
Before you add a new bay to your planogram, you must specify its parameters in this panel. A preview of the bay to create is displayed in the upper right area.
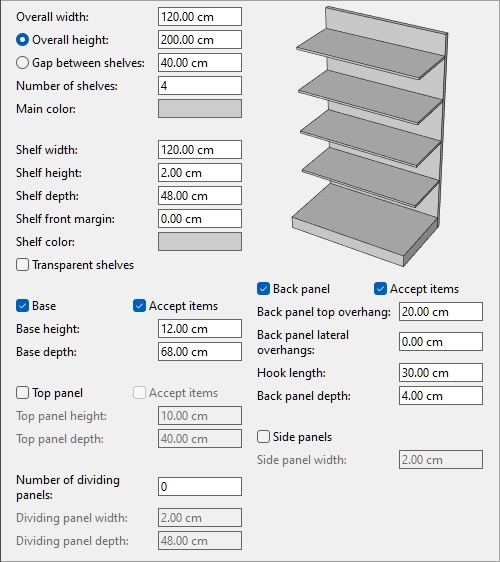
Note: the preview is displayed with visible edge lines to make each component clearly distinguishable. You can also turn this mode on in the planogram visualization area if you wish (View edges).
Note: the attributes of the bay will be kept for the next time you run the application.
Parameters of the whole bay (Create bays)
These are parameters for the entire bay to create.
Overall width (Create bays)
The physical width of the bay in the current measurement unit.
- Supported values: positive numeric value [0-9 and decimal point]
- Default value: 120 cm (or equivalent according to Measurement unit)
- Example: 240
Tip: You don't need to type the actual measurement unit (e.g., cm), only the value.
Overall height (Create bays)
Radio button
Upon typing a value for this parameter or manually checking the corresponding radio button, Overall height will be constrained to the set value. This way, editing other values such as Number of shelves won't change Overall height, but will automatically adjust Gap between shelves instead.
Tip: Choose Overall height and Number of shelves if you know the bay height.
The physical height of the bay in the current measurement unit.
- Supported values: positive numeric value [0-9 and decimal point]
- Default value: 200 cm (or equivalent according to Measurement unit)
- Example: 180
Tip: You don't need to type the actual measurement unit (e.g., cm), only the value.
Gap between shelves
Radio button
Upon typing a value for this parameter or manually checking the corresponding radio button, Gap between shelves is constrained to the set value. This way, editing other values such as Number of shelves won't change Gap between shelves, but automatically adjusts Overall height instead.
Tip: Choose Gap between shelves and Number of shelves if the space between each shelf is more important than the overall height of the bay.
Value
The vertical empty space between shelves in the current measurement unit. All shelves are evenly spaced.
- Supported values: positive numeric value [0-9 and decimal point]
- Default value: 40 cm (or equivalent according to Measurement unit)
- Example: 37.5
Tip: You don't need to type the actual measurement unit (e.g., cm), only the value.
Number of shelves
The number of shelves on the bay.
- Supported values: positive numeric value [0-9]
- Default value: 4
- Example: 0
Note: Changing the number of shelves influences Overall height if you checkmarked the radio button next to Gap between shelves. Inversely, changing the number of shelves modifies Gap between shelves if you checkmarked the radio button next to Overall height.
Note: Number of shelves counts standard shelves only, not including Base and Top panel.
Main color
The color of the structure (Base, Back panel, Side panels, Top panel).
- Supported values: any color picked from the color palette
- Default value: light gray
- Example: black
Instructions:
- Click on the color swatch next to Main color to display the color palette.
- Pick any color from the color palette.
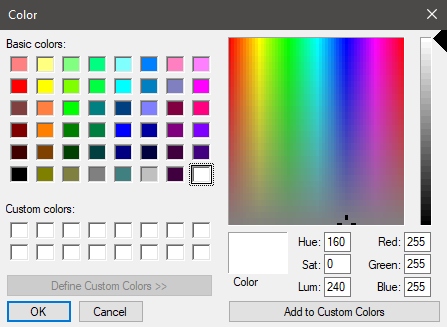
- Click OK to confirm.
Note: shelves have a separate color parameter, so you can make the shelves a distinct color than the rest of the bay (Shelf color).
Shelf parameters (Create bays)
The below parameters apply to the shelves of the bay.
Shelf width
The physical width of the shelves in the current measurement unit.
- Supported values: positive numeric value [0-9 and decimal point]
- Default value: 200 cm (or equivalent according to Measurement unit)
- Example: 180
Tip: You don't need to type the actual measurement unit (e.g., cm), only the value.
Shelf height
The physical height (thickness) of the shelves in the current measurement unit.
- Supported values: positive numeric value [0-9 and decimal point]
- Default value: 2 cm (or equivalent according to Measurement unit)
- Example: 2.54
Tip: You don't need to type the actual measurement unit (e.g., cm), only the value.
Shelf depth
The physical depth of the shelves in the current measurement unit.
Supported values: positive numeric value [0-9 and decimal point]
Default value: 48 cm (or equivalent according to Measurement unit)
Example: 30
Tip: You don't need to type the actual measurement unit (e.g., cm), only the value.
Shelf front margin
The distance at which products will be placed from the front edge of shelves.
This is useful if you want to leave some space for other items (tester, Accessory) at the front of the shelves.
Supported values: positive/negative numeric value [+-0-9 and decimal point] (based on Measurement unit)
Default value: 0
Example: 8
Note: negative values allow products to overhang at the front edge of shelves.
Shelf color
The color of the shelves.
- Supported values: any color picked from the color palette
- Default value: light gray
- Example: white
Instructions:
- Click on the color swatch next to Shelf color to display the color palette.
- Pick any color from the color palette.
- Click OK to confirm.
Transparent shelves
Specifies whether shelves are translucent or opaque.
- Supported values:
- Checkmarked: shelves are translucent.
- Not checkmarked: shelves are opaque.
- Default value: Not checkmarked
Tip: To simulate glass shelves, checkmark this and set Shelf color to white.
Parameters of the base
The below attributes define the base of the bay.
Base (Create bays)
Specifies the presence of a base on the bay.
- Supported values:
- Checkmarked: the bay will have a base.
- Not checkmarked: the bay will not have a base.
- Default value: Checkmarked
Accept items (Base (Create bays))
Defines whether you can drag items on the base of the bay. Sometimes products are placed directly on the base, while in other cases the base should not accept any products.
- Supported values:
-
- Checkmarked: items can be placed on the base.
- Not checkmarked: items cannot be placed on the base.
- Default value: Checkmarked
Base height
The physical height (thickness) of the base in the current measurement unit.
- Supported values: positive numeric value [0-9 and decimal point]
- Default value: 12 cm (or equivalent according to Measurement unit)
- Example: 18.2
Tip: You don't need to type the actual measurement unit (e.g., cm), only the value.
Base depth
The physical depth of the base in the current measurement unit.
- Supported values: positive numeric value [0-9 and decimal point]
- Default value: 68 cm (or equivalent according to Measurement unit)
- Example: 50
Tip: You don't need to type the actual measurement unit (e.g., cm), only the value.
Top panel parameters
The below attributes define a panel closing the bay at its top.
Top panel
Specifies the presence of a top panel on the bay. Checkmark this if your shelving unit should have a closed top.
- Supported values:
-
- Checkmarked: the bay will have a top panel.
- Not checkmarked: the bay will not have a top panel.
- Default value: Not checkmarked
Note: This component is created as a Shelf. See description in Shelf (New bay components).
Accept items (Top panel)
Defines whether you can drag items on the top of the bay.
- Supported values:
-
- Checkmarked: items can be placed on the top panel.
- Not checkmarked: items cannot be placed on the top panel.
- Default value: Not checkmarked
Top panel height
The physical height (thickness) of the top panel in the current measurement unit.
- Supported values: positive numeric value [0-9 and decimal point]
- Default value: 10 cm (or equivalent according to Measurement unit)
- Example: 4
Tip: You don't need to type the actual measurement unit (e.g., cm), only the value.
Top panel depth
The physical depth of the top panel in the current measurement unit.
- Supported values: positive numeric value [0-9 and decimal point]
- Default value: 40 cm (or equivalent according to Measurement unit)
- Example: 50
Tip: You don't need to type the actual measurement unit (e.g., cm), only the value.
Parameters of Dividing panel (Create bays)
The below parameters apply to the vertical dividing panels of the bay.
Dividing panels let you create pigeon holes bays.
Note: When dividing panels are specified here, each shelf is split into separate shelves between the dividing panels. If you want diving panels but you prefer to have single shelves across the whole width, you should rather specify 0 dividing panels here when creating the bay, then add dividing panels to the bay later in Modify bays > Dividing panel (New bay components).
Number of dividing panels
The number of vertical dividing panels in the bay.
- Supported values: positive numeric value [0-9]
- Default value: 0
- Example: 12
Dividing panel width
The physical width of the dividing panels in the current measurement unit.
- Supported values: positive numeric value [0-9 and decimal point]
- Default value: 2 cm (or equivalent according to Measurement unit)
- Example: 3.5
Tip: You don't need to type the actual measurement unit (e.g., cm), only the value.
Shelf height
The physical height (thickness) of the shelves in the current measurement unit.
- Supported values: positive numeric value [0-9 and decimal point]
- Default value: same value as Overall height (Create bays)
- Example: 2.4
Tip: You don't need to type the actual measurement unit (e.g., cm), only the value.
Back panel parameters (Create bays)
The below attributes define the back panel of the bay.
Back panel (Create bays)
Specifies the presence of a rear panel on the bay.
- Supported values:
- Checkmarked: the bay will have a back panel.
- Not checkmarked: the bay will not have a back panel.
- Default value: Checkmarked
Accept items (Back panel (Create bays))
- Defines whether you can drag items on the back panel of the bay, typically products that are pegged.
Supported values:
- Checkmarked: items can be placed on the back panel.
- Not checkmarked: items cannot be placed on the back panel.
- Default value: Not checkmarked
Back panel top overhang
The vertical overhang of the back panel from the upmost shelf. This setting also influences Value.
- Supported values: positive numeric value [0-9 and decimal point]
- Default value: 20 cm (or equivalent according to Measurement unit)
- Example: 45
Back panel lateral overhangs
The lateral overhang of the back panel on each side of the shelves. If you set a positive value, this setting also influences Overall width, effectively making the bay wider than the shelves.
- Supported values: positive/negative numeric value [+-0-9 and decimal point] (based on Measurement unit)
- Default value: 30 cm (or equivalent according to Measurement unit)
- Example: 15
Tip: You don't need to type the actual measurement unit (e.g., cm), only the value.
Hook length (Back panel (Create bays))
The distance from the back panel to the tip of pegs. The specified length is then used to determine how many times each pegged product is repeated in depth on the hooks.
- Supported values: positive numeric value [0-9 and decimal point]
- Default value: 4 cm (or equivalent according to Measurement unit)
- Example: 2.5
Notes:
You don't need to type the actual measurement unit (e.g., cm), only the value.
Each actual hook is created and displayed automatically when you place a product on the back panel.
The hooks can also be hidden if you prefer (View peg hooks).
Back panel depth
The physical depth (thickness) of the back panel in the current measurement unit.
- Supported values: positive numeric value [0-9 and decimal point]
- Default value: 4 cm (or equivalent according to Measurement unit)
- Example: 2.5
Tip: You don't need to type the actual measurement unit (e.g., cm), only the value.
Side panels parameters
The below attributes define the side panels of the bay.
Side panels
Specifies the presence of side panels on the bay.
- Supported values:
- Checkmarked: the bay will have a back panel.
- Not checkmarked: the bay will not have a back panel.
- Default value: Not checkmarked
Note: each of these components is created as a Dividing panel. See description in Dividing panel (New bay components)
Side panel width
The physical width (thickness) of each side panel in the current measurement unit.
- Supported values: positive numeric value [0-9 and decimal point]
- Default value: 2 cm (or equivalent according to Measurement unit)
- Example: 3.6
Tip: You don't need to type the actual measurement unit (e.g., cm), only the value.