Tools and commands (Room)
The object editing toolbar includes a tool to work on the Room:

Some additional commands that can be used with Room and elements can be found in another toolbar described in General edit commands:
- Undo (Edit)
- Redo (Edit)
- Delete (Edit)
The tools and commands to work with room elements are also available in Main Menu > Edit:
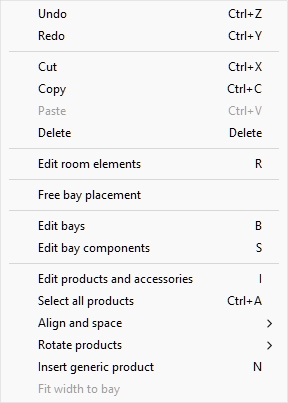
The tools and commands which are specific to Room are described below.
Edit room elements
This tool lets you select room elements and perform various operations such as editing the room and its elements properties or moving and copying elements.
- Keyboard shortcut: R
Note: This tool is automatically activated when you switch to Room. In contrast, the keyboard shortcut activates the tool so you can select room elements even without switching to Room.
Select (Edit room elements)
- Click on Edit room elements.
- Select the desired room elements:
- To select one element, click on the desired element in the visualization area.
- To select multiple elements: Hold the Ctrl key while clicking on desired elements. Or draw a rectangle with your mouse pointer across the desired elements.
- Selected elements become(s) highlighted in blue so you can perform several tasks with it (them).
To deselect one or more elements, click in an empty area in the visualization area, or Ctrl + click on the selected elements.
Move (Edit room elements)
- Select elements.
- Drag the selected elements with the left mouse button pressed.
- Release the mouse button.
Notes:
- With View grid, elements are moved to 1 cm (or 0.5”) rounded position values.
- Without View grid, elements are snapped to the grid lines.
- To move elements completely freely, you can hold the space bar while moving, producing a slower motion and preventing position rounding.
Tip: The position can also be defined precisely. Consult Position Y (Selected room elements), Position Z (Selected room elements), Position X (Selected room elements).
Copy by moving (Edit room elements)
- Select elements.
- Press and hold Ctrl key down.
- Drag the selected elements with the left mouse button pressed.
Notes:
- With View grid, elements are copied to 1 cm (or 0.5”) rounded position values.
- Without View grid, elements are snapped to the grid lines.
- To copy elements completely freely, you can hold the space bar while copying, producing a slower motion and preventing position rounding.
Resize (Edit room elements)
Elements can be resized by dragging handles on the object(s) with your mouse:
- Select the desired room elements. They (It) become(s) highlighted with round handles around the surfaces most closely facing the screen.
- If the round handles do not appear on the selected elements, use Zoom to enlarge them on screen.
- If the round handles do not appear on the desired surface, use navigation tools such as Orbit to make the desired surfaces face the screen.
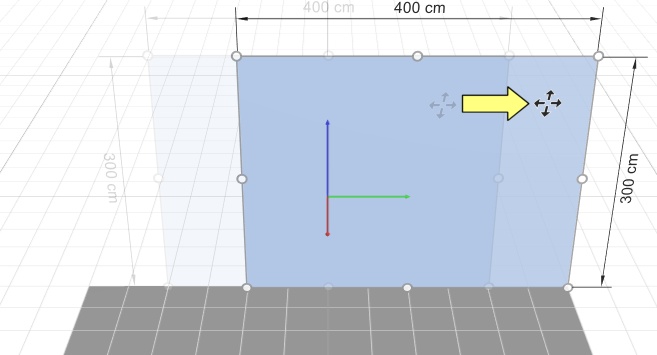
- Grab a handle with the mouse and drag it until your elements reach the desired size(s). The corner handles let you resize in two directions, while the handles along edges let you constrain resizing to one direction.
- Release the mouse button when you are satisfied with the element dimensions.
Note: room elements are normally resized to 1 cm or 0.5” rounded position values. To resize elements completely freely, you can hold the space bar while resizing, producing a slower motion and preventing dimension rounding.
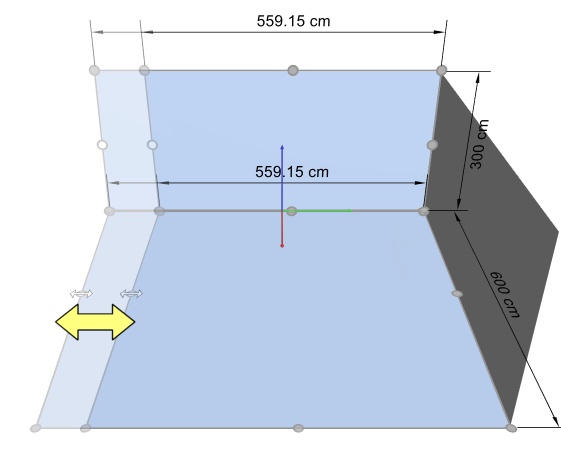
Tip: The dimensions of the resizing rectangle are displayed while resizing if View dimensions is ON, as shown in the above picture. This is useful if you know in advance the space to allocate to the room elements.
Tip: The actual dimensions of the selected room elements are displayed when View dimensions is ON, and while you are not dragging a handle:
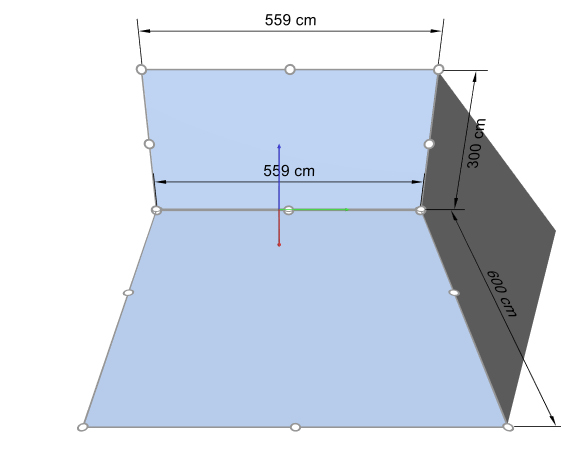
Tip: Handles are convenient for quick mouse editing, but you can also specify precise values. Consult Width (Selected room elements), Height (Selected room elements), Depth (Selected room elements).