Source file (Import project)
A file with the list of products and accessories to place in the project.
The list can contain all or a subset of the products in your database, each listed by Reference. Products not found in your database are disregarded.
Supported file formats: Microsoft Excel (*.xls or *.xlsx)
Example file: you can download an example of a valid file containing a list of the sample products in PlanogramBuilder: sample_files/import_project/import_project_sample_source_file.xlsx
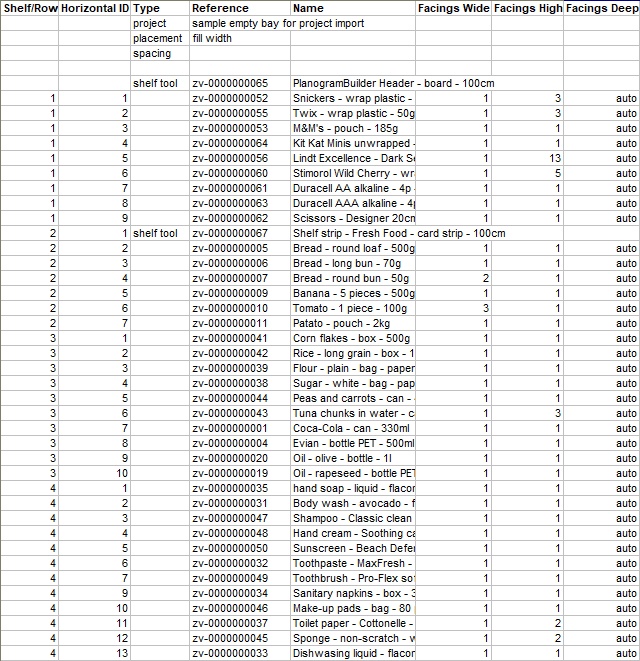
Example of a spreadsheet to import
Import Project Syntax
Notes:
Only the first sheet of your spreadsheet is considered for import.
All the parameters listed below are case insensitive.
Blank lines (empty reference cell) in input files are ignored.
General format (Import project)
Rows
In your spreadsheet, each row below the column headers corresponds to one element to import or to specify.
Columns
Your Excel sheet can contain various columns to specify the import parameters and values.
Compulsory columns:
- Type:Under this column header, each cell specifies the type of element on its row. A description of each type of supported element is available in Supported elements (Import project) for:
- Reference: Under this column header, the cell for each row specifies the value of the item, for example the actual bay or product to import.
Optional columns:
Other columns can be added for some types of elements to further define the way they are imported. These are described below for applicable element types.
Supported elements (Import project)
project (Import project)
Optionally, create a row with this value under the column named Type to specify a saved project with an empty bay onto which the products and shelf tools will be placed upon import. This lets you place the products onto your own predefined bays.
Supported columns and values:
- Column: Type
-
- Value: project
- Column: Reference
-
- Supported values: the name of the project spelled exactly as listed in List of projects > Name (Project properties).
Example:
|
Type |
Reference |
|
project |
sample empty bay |
Notes:
If you don’t specify a project line in the Excel file or if the referenced project doesn't exist, the importer creates a generic bay automatically with dimensions fitting all the products and accessories listed in your spreadsheet.
Only one project can be referenced in each Excel file to import.
If several saved projects exist with the specified name, the imported uses the most recently saved project amongst those.
placement
Optionally, create a row with this value under the column named Type to specify the way products are distributed on shelves.
Supported columns and values:
- Column: Type
- Value: placement
- Column: Reference
- Supported values:
- center: upon import, all items are placed as close to each other (also taking into account spacing) and centered laterally on the shelf.
- fill width: upon import, all items are distributed with equal lateral spacing so as to fill the whole width of the shelf.
- left: upon import, all items are placed as close to each other (also taking into account spacing) and pushed against the left edge of the shelf.
- right: upon import, all items are placed as close to each other (also taking into account spacing) and pushed against the right edge of the shelf.
- empty: leaving the cell value empty defaults to center.
Example:
|
Type |
Reference |
|
placement |
fill width |
Notes:
This parameter is only effective on shelves that contain only products. For shelves which also include accessories, the items are placed as if the value left was specified.
Only one row with the value of placement in the column named Type can be referenced in each Excel file to import.
When spacing is higher than the calculated space for placement, items are placed according to spacing. In this case if there is not enough room on the bay referenced in the project, some items may not be placed in the planogram.
spacing
Optionally, create a row with this value under the column named Type to specify the desired lateral gap between imported items.
Supported columns and values:
- Column: Type
- Value: spacing
- Column: Reference
- Supported values: positive number [0-9 and decimal point]. Enter the desired distance for spacing (according to Measurement unit). Enter 0 if you want your products adjacent.
Example:
|
Type |
Reference |
|
spacing |
2.4 |
Notes:
Only one row with a value of spacing in the column named Type can be referenced in each Excel file to import.
You can also disregard this setting and automatically spread products on the shelf width with automatically spread on the shelf width using placement = fill width.
Product (Import project)
Create a row with this value under the column named Type to specify a product to import. (this is the default value if no type is specified on the row).
Supported columns and values:
- Column: Type
-
- Value: Product
- Column: Reference
-
- Supported values: Reference of a product existing in your database, spelled exactly as in Item properties.
- Optional column: Shelf/Row
-
- Supported values: positive number [1-9] specifying on which shelf or row of the bay to place the product. Notes:
- Numbering starts from the top and ends at the lowest row or shelf of the bay.
- Products with empty values are placed on shelves based on their row order in the Excel sheet, starting at the first (top) shelf and ending at the last (lowest) shelf, based on the available space on each shelf.
- Optional column: Horizontal id
-
- Supported values: Positive number [1-9] specifying the order of the product from left to right on its shelf or row. Notes:
-
- Each block of multiple same products counts as 1 Horizontal id.
- For products with empty values, the horizontal order is determined by the respective order of their rows in the Excel sheet.
- Optional column: Facings wide
-
- Supported values: Positive number [1-9] specifying how many instances of the same product must be placed adjacent in width on shelf. A missing column or empty value defaults to 1.
- Optional column: Facings high
-
- Supported values: Positive number [1-9] specifying how many instances of the same product must be stacked adjacent in height on shelf. A missing column or empty value defaults to 1.
- Optional column: Facings deep
- Supported values:
- positive numeric value [1-9] specifying how many instances of the same product must be placed adjacent in depth on shelf.
- auto: with this value, the number of products in depth is automatically determined by the depth available on the shelf or peg.
- Empty: a missing column or empty value defaults to auto.
Example:
|
Type |
Reference |
Shelf/Row |
Horizontal id |
Facings wide |
Facings high |
Facings deep |
|
Product |
zv-0000000030 |
2 |
5 |
1 |
12 |
|
Note: Pegged products can be imported, but they require a physical shelf on the bay referenced in project (Import project). If there is no referenced project in your Excel file, shelves are automatically created for pegged products. Please note that you should delete these extra shelves after import. This won't remove the pegged products.
Accessory (Import project)
Create a row with this value under the column named Type to specify an accessory to import.
Supported columns and values:
- Column: Type
-
- Value: Accessory
- Column: Reference
-
- Supported values: Reference of an accessory existing in your database, spelled exactly as in Item properties.
- Optional column: Shelf/Row
-
- Supported values: positive number [1-9] specifying on which shelf or row of the bay to place the accessory. Notes:
- Numbering starts from the top and ends at the lowest row or shelf of the bay.
- Accessories with empty values are placed on the bay based on their row order in the Excel sheet, starting at the first (top) shelf and ending at the last (lowest) shelf, based on the available space on each shelf.
- Optional column: Horizontal id
-
- Supported values: positive numeric value [1-9] specifying the order of the accessory from left to right on its shelf / row. Note: For accessories with empty values, the horizontal order is determined by the respective order of their rows in the Excel sheet.
Example:
|
Type |
Reference |
Shelf/Row |
Horizontal id |
|
Accessory |
zv-0000000067 |
3 |
2 |
space
Create a row with this value under the column named Type to specify an empty gap between two items. This type of item doesn’t need any value under the column named Reference. space is only taken into account by the importer if another line with Type = placement and Reference = fill width is present.
Supported columns and values:
- Column: Type
- Value: space
Example:
|
Type |
|
space |
section
Create a row with this value under the column named Type to place a group of items defined within the same spreadsheet by section start. Typically, you can use sections to place groups of items which always belong together on the shelves.
Supported columns and values:
- Column: Type
-
- Value: section
- Column: Reference
-
- Supported values: text string referencing the name of the section to place. The name of the section must be defined in section start.
- Optional column: Facings wide
-
- Supported values: positive number [1-9] specifying how many times the entire section will be placed adjacent laterally on shelf. A missing column or empty value defaults to 1.
- Optional column: Facings deep. This parameter only applies to individual products in the referenced section for which no Facings deep have been specified at the product level.
-
- Supported values:
- positive numeric value [1-9] specifying how many instances of the same product must be placed adjacent in depth on shelf.
- auto: with this value, the number of products in depth is automatically determined by the depth available on the shelf or peg.
- Empty: a missing column or empty value defaults to auto.
Example:
|
Type |
Reference |
Facings wide |
Facings deep |
|
section |
Section1 |
1 |
5 |
Note: Horizontal id must be incremented for all items, including those defined within the section. This means that an item placed to the right of a section should have a value for Horizontal id which accounts for the number of products contained in the section. Remember however that Horizontal id is optional, so it is usually simpler to leave it blank and have items automatically be placed from left to right according to the Excel line order.
section start
Create a row with this value under the column named Type to define the content of a section (a group of items).
All items listed in the lines below section start become part of the group.
The end of the section group is defined by the line above the next section start, or by the end of the file if there is no section start below. This means you should always place section start definitions at the end of your file, below all other items that are not part of a section.
Supported columns and values:
- Column: Type
- Value: section start
- Column: Reference
- Supported values: text string defining the name of the section.
Example:
|
Type |
Reference |
|
section start |
Section1 |
Here is an example of a file using a section:
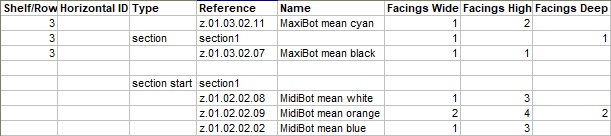
In the above example:
- Section1 is defined at the end of the file with section start and 3 products listed below. The second product in the section will be placed twice in width.
- Section1 is placed on the bay with section start on shelf 3 at Horizontal id 2, in between z.01.03.02.11 and z.01.03.02.07.
Note: Horizontal id is incremented for all items including those defined within the section. In this case this means that the item to the right of the section should have a value of 5 for Horizontal id to account for the 3 IDs contained in the section. Remember however that Horizontal id is optional, so you can also leave it blank and have items automatically be placed from left to right according to the Excel line order.
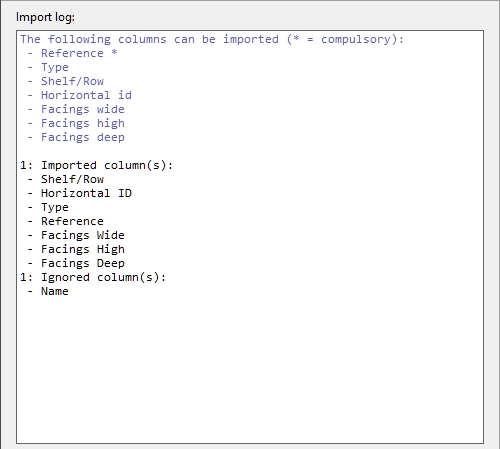
Import log (Import project)
This area shows the following information:
- In blue text, to help you prepare your input spreadsheet: list of supported columns
- In black text, once you’ve imported a file: list of imported and ignored columns.
- In red text, once you’ve imported a file: list of errors